The Needs
- Raspberry Pi 3
- Memory Card
- USB Drive
- Power
- A screen
- A Keyboard
- Internet
The Downloads
Download older image from Raspberry Pi archive http://downloads.raspberrypi.org/arch/images/
Latest available is http://downloads.raspberrypi.org/arch/images/arch-2014-06-22/ArchLinuxARM-2014.06-rpi.img.zip
Latest root file system from http://os.archlinuxarm.org/os/ArchLinuxARM-rpi-latest.tar.gz
on windows you need both. Alternatively this is just the boot sector from an image that works
Download 7-zip http://www.7-zip.org/ – This is used to extract the downloaded image file
Download Win32 Disk Imager from https://sourceforge.net/projects/win32diskimager/files/ – This is used to load the downloaded image to a memory card.
To just make it work this is the product of this guide.
Copying the Image to the SD card
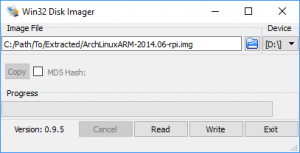
Use Win32 Disk Imager to write the extracted ArchLinuxARM-2014.06-rpi.img to the memory card. Be careful at this step because if you select the wrong drive you can lose information or cause your PC to be unusable. This process should take somewhere between 3 – 10 minutes depending on the speed of your SD card.
A new drive should show up with a few file. Delete everything and copy boot from the latest image to boot on the SD Card. Overwrite everything.
Then change the following line in /boot/cmdline.txt to make it work. This is already done in my boot sector download
Original (Truncated for clarity):
root=/dev/mmcblk0p2 rw rootwait console=ttyAMA0,.................
Modified (Truncated for clarity):
root=/dev/mmcblk0p5 rw rootwait console=ttyAMA0,..................
You can now insert the card into the Raspberry Pi. Attach it to your screen and power it up.
If everything goes well you have working old system.
If you see Kernel Panic, check the cmdline.txt for errors.
If everything works and you see this:
Arch Linux 4.4.23-1-ARCH (tty1)

alarmpi login:
you are ready to start getting to the latest Arch.
Round 1
Attach a network cable and insert the USB Drive. To save some time you can copy the ArchLinuxARM-rpi-latest.tar.gz downloaded before onto the USB Drive before this step.
We will now use the old image to format the USB Drive similar to the instructions at archlinuxarm.org with a few twists mainly because we do not hav mkfs.vfat on the image downloaded. Then we will create a disk image, copy that to your Windows PC and finaly use Win32 Disk Imager to write your own image to the SD Card.
login as: root
root's password: root

[root@alarmpi ~]# mount /dev/sda1 /mnt/
[root@alarmpi ~]# cp ArchLinuxARM-rpi-latest.tar.gz /root
[root@alarmpi ~]# umount /dev/sda1
[root@alarmpi ~]# fdisk /dev/sda
In the fdisk prompt:
- 0 – clears old partitions
- p – make sure it is clear
- n – New Partition
- p – Primary Partition
- 1 – First Partition
- ENTER – Accepts Default
- +100M – Make it 100MB big
- t – Set partition type
- c – W95 FAT32 (LBA)
- n – New Partition
- p – Primary Partition
- 2 – Second Partition
- ENTER – Accepts Default
- ENTER – Accepts Default
- w – Write Partition Table
[root@alarmpi ~]# dd fi=/dev/mmblck0p1 fo=/dev/sda1
[root@alarmpi ~]# mkfs.ext4 /dev/sda2
[root@alarmpi ~]# mkdir /mnt/root
[root@alarmpi ~]# mkdir /mnt/boot
[root@alarmpi ~]# mount /dev/sda1 /mnt/boot
[root@alarmpi ~]# mount /dev/sda2 /mnt/root
[root@alarmpi ~]# bsdtar -xpf ArchLinuxARM-rpi-2-latest.tar.gz -C /mnt/root
[root@alarmpi ~]# mv /mnt/root/boot /mnt/boot
[root@alarmpi ~]# umount /dev/sda1
[root@alarmpi ~]# umount /dev/sda2
[root@alarmpi ~]# dd fi=/dev/sda fo=/dev/root/alarm.img
You can now copy this image to your computer. Either with another USB drive or by using scp/Filezilla to copy it via SFTP.
Once the image is on your computer use Win32 Disk Imager to write the new Image to the same or new SD Card. This SD Card is now ready to boot your Raspberry Pi and includes Wifi capabilities.
Round 2
On the console with a screen and keyboard.
login as: root
[email protected]'s password: root
Create a file for wpa_supplicant
[root@alarmpi ~]# nano /etc/netctl/wlan0
Description="Wifi"
Interface=wlan
Connection=wireless
Security=wpa-configsection
IP=dhcp
WPAConfigSection=(
'ssid="wifiName"'
'psk="Password"'
)
Test the wireless configuration
[root@alarmpi ~]# netctl start wlan0
You can check by running
[root@alarmpi ~]# ip addr

.....................
3: wlan0: <BROADCAST,MULTICAST,UP,LOWER_UP> mtu 1500 qdisc fq_codel state UP group default qlen 1000
 link/ether xx:xx:xx:xx:xx:xx brd ff:ff:ff:ff:ff:ff
 inet xx.xx.xx.xx/xx brd xx.xx.xx.xx scope global wlan0
................................
If it is working enable it at startup
[root@alarmpi ~]# netctl enable wlan0
You can now reboot the Raspberry PI to ensure it is working as expected.
[root@alarmpi ~]# reboot
After a successful reboot check SSH is working and then your system is ready to go headles(root cannot login to ssh directly)
login as: alarm
[email protected]'s password: alarm
and upgrade to the latest and greatest. (This takes time)
I had to change the mirrors to the SA one as the Geo-IP based mirror was timing out the whole time.
[alarm@alarmpi ~]$ su
Password: root

[root@alarmpi ~]# nano /etc/pacman.d/mirrorlist
Replace
Server = http://mirror.archlinuxarm.org/$arch/$repo
With – obviously do this with something that makes sense for you from here
Server = http://za.mirror.archlinuxarm.org/$arch/$repo
Upgrade pacman db to latest format
[root@alarmpi ~]# pacman-db-upgrade
[root@alarmpi ~]# pacman -Syu --force
Reboot
[root@alarmpi ~]# reboot
And you are in business. Almost.
Increase the security
Regenerate the SSH keys to ensure uniqueness
[root@alarmpi ~]# ssh-keygen -f /etc/ssh/ssh_host_rsa_key -N '' -t rsa
[root@alarmpi ~]# ssh-keygen -f /etc/ssh/ssh_host_dsa_key -N '' -t dsa
[root@alarmpi ~]# ssh-keygen -f /etc/ssh/ssh_host_ecdsa_key -N '' -t ecdsa
[root@alarmpi ~]# ssh-keygen -f /etc/ssh/ssh_host_ed25519_key -N '' -t ed25519
Change the passwords
[root@alarmpi ~]# passwd root
[root@alarmpi ~]# passwd alarm
That’s it
Now you should have a working system that you can do what you please with and expand on. More guides may follow but most likely there will be more snippets than complete guides.
Post Revisions:
- October 16, 2016 @ 08:31:05 [Current Revision] by Nymus
- October 16, 2016 @ 08:31:05 by Nymus